22 June 2022 | Marketing
Your blog publishing checklist
By Tracey Wallace
How to prep and publish finalized content
Like many content marketers, I started out as a team of 1. That meant that I was the:
- Writer
- Editor
- Graphic designer
- Publisher
- SEO-er
- Promoter
But that began for me back in 2014, when tech company blog posts were at most 800 words. And, I wasn’t new to the task.
I uploaded content into CMS tools for ELLE.com and Mashable prior to that. Writers have long coded their own content onto the web. And, I do mean coded. It was required, for instance, at ELLE.com that you use the HTML editor and never the visual one. Why? Because “the visual editor doesn’t work well and the content you publish will look like shit if you use it.”
Their words.
Over the next several years in content marketing, though, I built out a mental model for creating high quality content that often resulted in more than 3,000 words, always featuring more than three real-world examples, and including dozens of screenshots of exactly how to do what I was describing.
This meant that I had a whole heck of a lot of content to load into Wordpress. Seriously, my longest piece was more than 50,000 words and I published it as a book.
Still today, there are few known ways to export Google Doc copy and images into Wordpress easily––though a couple folks on Twitter say they have found a way!
So have I, but I estimate it takes me 2-4 hours per post to upload content properly.
This is because how you publish your content is just as important as any other part of the process––and it’s one of the most overlooked.
You can learn a lot about a content team’s––solo or otherwise––future success based only on their understanding of how to prep and publish finalized content.
- There are SEO considerations here––like image name, and size, and removing the awful HTML formatting you’ll get if you just copy and paste directly from Google Docs to Wordpress.
- There are accessibility considerations––like including readable titles and alt text for all of your images and not just leaving it blank because that’s the easy thing to do.
- There are UX considerations––like where you put pull quotes (never next to an image) and how you format headers (Does Russian Doll-ing them make sense, or does it look better to turn some H4s into H3s, for instance).
I’ve turned how I publish content into a checklist, and I now bring it with me to every company I go. It’s helped me build out content teams, and make sure that everyone, across the board, knows how to upload content in the case I can’t.
It was a hard-won hand off of a task, though I still like to have the author or owner of a piece upload the content themselves, even if that person is me.
This just seems fair. Besides, I’ve been through years of trial and error with handing this task off to virtual assistants, and I’ve always found some kind of passion lost in the translation from Doc to webpage.
Something is always missing––a link, better formatting, improved scannability, etc. The owner of the piece seems to just care more. And they should.
I customize this checklist, of course, for the unique use cases at each company. Not everyone uses Wordpress, for instance, and even if they did, many Wordpress instances are customized.
In general, this list applies across all CMS tools, and across all teams. I’ve used it in Wordpress, Webflow and even for static sites in which I moved copy from Google Docs to markdown files.
Moreso, this isn’t just a checklist for tech company blogs. Anyone publishing content on the internet should look it over. I’d highly advise you to follow it.
But, that’s up to you.
Your doc-to-web publishing checklist
Here is the full checklist to duplicate, and you can find it below, too.
- Ensure the piece is at least an A- on Clearscope –– no matter what the piece is.
- Not an A? Consider targeting a different keyword or key phrase.
- Resize all images to at MOST 1,000px width. Size should be less than 50kb
- Tinfy-ify all images on TinyPNG or TinyJPG and download.
- Rename and save all images on your computer following the naming convention in the Google Doc.
- If there isn’t a naming convention in the Google doc, ping your manager to figure one out.
**Important: You can improve your Clearscope score based on how you name images. It’s a good way to get a leg up, but you have to be detailed about it. A lot of folks skip this step.**
- When uploading content to Wordpress, you want to first use the Doc to Markdown add-on on Google Docs. Click HTML and then copy and paste the HTML text into the TEXT side of Wordpress, not the visual side. From there, click on the visual side to finalize editing. This removes formatting properly from Google Docs.
- Fill in image meta-data ––all of it. For every image.
- This includes alt text. Please make this a readable sentence in the case the image does not load or if someone needs to understand the image without seeing it. Here is more information on best accessibility practices on the web.
- Upload the meta-image to the piece.
- Once you publish, use Twitter card validator to make sure the image is pulling through properly. Twitter is always the most finicky of the social platforms for me…so, if it works here, it will work anywhere.
- Upload the meta-title
- This should be in the Google Doc. If it is not, let your manager know and together, figure one out.
- The meta title should not be the title of your article. This is a shooter, optimized headline for click rates on Google Search. Consider this organic ad space.
- *Note that Google changes meta-titles if they do not accurately represent the content. Please be a good user of the web, and use meta-titles that are relevant*
- Upload the meta-description
- The meta-description is at most two sentences and should further encourage readers on Google to click into the article. Consider this organic ad space.
- This should be in the Google doc. If it is not, let your manager know and together, figure one out.
- Properly format all content on the webpage:
- The Doc to Markdown tool should have done this for you. Double check it. Make sure there are no errors, no weird spacing, no weird HTML code. And be sure to include:
- Proper Header tags
- Ensure that header tags follow the correct order:
- Only 1 H1 – the title
- H2s for major headings
- H3s for minor headings (headings under a major heading, but not a new section)
- And so on.
- Ensure that header tags follow the correct order:
- Pull quotes
- Ensure pull quotes are not right above or right below an image.
- Ideally, they are also not right above or right below a header of any size.
- Proper Header tags
- The Doc to Markdown tool should have done this for you. Double check it. Make sure there are no errors, no weird spacing, no weird HTML code. And be sure to include:
**Pull quotes should be used to help tell a scannable story, and break up blocks of text. Images and Headers do this on their own. Don’t gather your scannable items into one spot––use them wisely.**
- Ordered and unordered lists
- Have these pulled in properly? If not, fix.
- Images
- Images should be cited / sourced correctly, and that citation should live directly under the image itself, with a link to the original where needed.
- Properly format all images including:
- Right, left or center orientation?
- Included Alt text in sentence form to describe the image
- Properly size images for your CMS and for the specific piece (Not all images need to be full size, for example.)
- Links
- Are all the links working properly?
- Have you made them open in a new tab?
- Have you linked within your own site properly? (Ideally this is done in the editing stage and you don’t have to worry about it here, but alas, it’s worth a mention).
- Edit the slug to the proper slug for the piece
- Does this or another piece need to be redirected? Ping the SEO team ASAP after publish.
- Manually add in a table of contents for longer-form pieces. (Bonus points if your CMS does this for you)
- If there is a TOC in the Google doc, add it to the article.
- You will need to anchor the link. Here is how to do that.
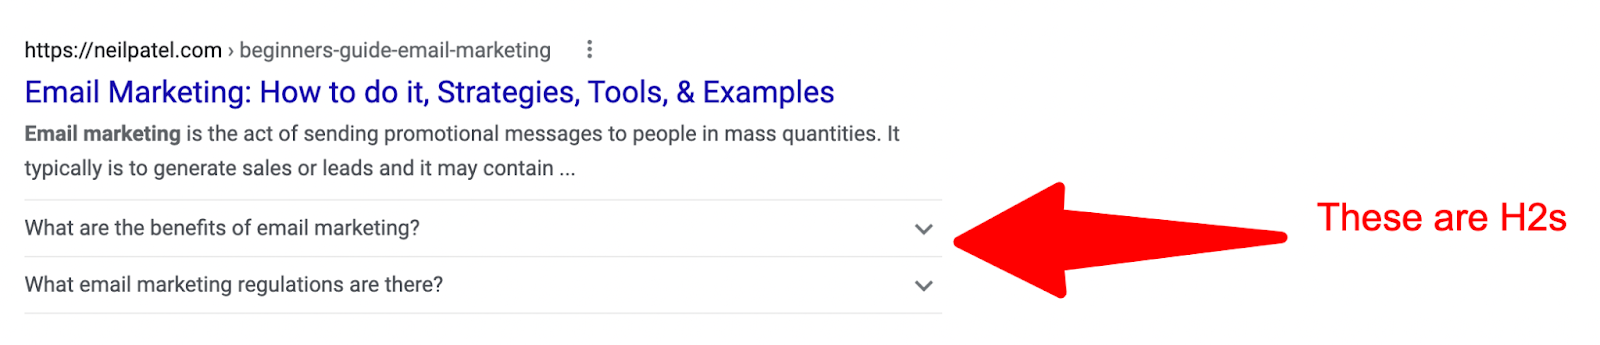
- Anchor link on your H2s
- Anchor links––and therefore your H2s––should be mapped so that if you took all the subheads, they could tell their own story as a summary of the larger piece, and still provide value for the reader.
- Don’t make your H2s incredibly long. They should still be headlines, and they can often pull into Google search results, too. Two examples below:

- Publish the piece, and inspect––read through it again, make sure everything looks right. Do not share it until it does.
- Are all experts properly linked? Their LinkedIn or Twitter profile? The company where they work?
- Are all images properly cited?
- Do all images have proper meta-information and naming conventions?
- Are any images blurry? Contact the design team (though you probably made it blurry when reducing size. Start over for that image. A bit bigger in size could help).
- Is the meta-image pulling through properly on social via the Twitter validator? If not, fix it.
- Move the piece to the Published section in your project management tool.
That’s it for this week! Next week, we’ll talk about thought leadership, what people think it means, what it actually means, and how to earn it.
Hope you enjoy your summer until then!
A note on this advice you’ve solicited by signing up:
You do you!
One content marketer’s best practices aren’t always right for another one, though I do try to distill out the main concepts and core practices I believe everyone can benefit from. That said, you must use good judgment when deciding whether to take advice given from folks on the internet. I am an expert, and this advice comes from my direct experience, but I am not smarter than you, and I have nothing to gain or lose because of what you do.